Introduction:
I had doubts about the focus accuracy of my viewfinder auto focus system. While I was in a studio my models faces upon which I had focused appeared to be slightly out of focus. The area behind the face like the models hair and shoulders appeared to be slightly more in focus. I normally focused on the eye or face using single point auto focus and using the centre point. I initially assumed that this was normal since I was looking at the images at 100%. Since it was difficult to know for sure I decided to do further testing.
This blog documents the process I used to verify the single, centre point auto focus accuracy of my 4 month old DSLR which does not have auto focus fine tuning. However, you can use the method below to auto focus fine tune your camera if it does have the 'autofocus fine tuning' feature. This method is not testing the sharpness of a lens but only the focus accuracy of the camera and lens combination. I am also deliberately not going to tell you what camera I have since I do not want to create panic or false impressions about the camera.
The assumption made here is that Live View is the gold standard for focus accuracy if you do not have the auto focus fine tuning feature with your camera. If you do have the auto focus fine tuning feature with your camera, then you can compare images as you make auto focus fine tuning adjustments one after another until you feel you got it right. If you don't have auto focus fine tuning then you have to use the live view image as a comparison and the gold standard for accurate focus.
I am also not going to go into the theory behind the testing. That is beyond the scope and purpose of this blog. This blog is only to show a test setup.
I had searched the various ways people have focus tested their cameras including different focus test charts that you were required to angle your camera at 45 degrees. Although I tried this test I have also read that it may be very prone to errors during testing and that it was not the best type of test. My own research found that it was better to use a flat target. So based on my research, here is the method I came up with. I believe it is very accurate. I suggest you follow all the steps that I describe.
Equipment Used:
DSLR - with our without auto focus fine tuning
Prime lens or zoom with a faster aperture than f2 but not too important - use whatever lens you have if you have auto focus fine tuning
Tripod
Ideally you would use a remote trigger
Editing software such as Photoshop to view images at 100%
Flat card board or similar surface
8X10 Target
one metre ruler or tape measure
Conditions:
No wind
Bright sunny day
It's important that the lighting conditions do not change significantly while taking pictures (such as from big clouds passing by) because bad lighting can make details in the pictures look blurry.
The test target:
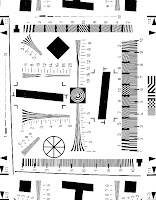
You probably should not use a curved target because it is difficult to know where the camera's auto focus sensor focuses on. Use a flat target. Here is the target you can download and print. Make sure you print in the highest quality. I used a B&W laser printer. If you print a poor quality target, the edges of the target symbols and numbers can bleed (look blurry) and this might look as if the image is out of focus. So start by printing an excellent quality target. http://www.gpsinformation.org/jack/photo-test/pics/iso-rag.jpg

The target will be attached horizontally to the cardboard. I attached mine about 2 1/2 feet off the ground. I notched out an 'L' shape on one edge of the cardboard and aligned the target with that edge. The purpose of the notch is to rest your ruler on so that it is as close to the target as possible. This will also allow you to see the entire length of the ruler while you focus on the target.

Positioning the Camera and Target:
Position the target about 50 times the focal length away from the camera and tripod set up. So for an 85mm lens, you would put your camera about 15 feet away (sorry about the metric and imperial units of measure). I tested my camera with the lens focal length at 85mm. You can do more testing at other focal lengths. For a 35 mm lens you would position your camera about 5 feet away. For a zoom lens pick a focal length at which the lens is known to perform best. The target and the camera focal plane should be parallel to one another. This means that the camera should be exactly in front of the target. You should not be pointing the camera down at the target or up at the target. You should not be aiming the camera from either side towards the target. The camera and target must be directly across from one another.
For preparing to take the pictures use the following settings on your camera:
For taking the picture:
This one photo is using the viewfinder auto focus:

If you do not have the auto focus fine tuning feature :
Without touching your equipment setup, gently and carefully switch the camera into live view. Use your hand to carefully and gently rotate the focus ring so that it is out of focus.

At this point you are finished. You can take more pictures using a different lens. For each lens or different focal lengths on the same lens you can repeat taking pictures using normal viewfinder auto focus as described above (and ending with a photo using live view to compare to if you do not have the auto focus fine tuning feature).
At the Computer:
Take your memory card and look at the pictures you made. I was using Photoshop CS4. I looked at the pictures at 100%. No adjustments were made to the photos other than cropping. Look at your image taken using normal auto focus compare them. If you do not have the auto focus fine tuning feature then compare it to the image taken using Live View. (Your live view image should be completely in focus and is the gold standard). The area on the ruler that is in line with the target should also be in focus. Also look at the ruler and observe how much of the area of the ruler is in focus. Ask yourself, Is the target paper within the area of the ruler that is in focus? If the answer is yes then your camera is focusing accurately. You can also see if the camera is focusing more of the area behind the target or in front of the target.
Comparing normal auto focus on the left and live view auto focus on the right. Or if you have auto focus fine tuning, compare several images while making fine tuning adjustments:

The general rule of thumb is that the camera should focus about 1/3 of the way in front of the target and the remaining 2/3 behind the target. So look at the ruler. Ask yourself, how much of the area on the ruler in front of the target is in focus and how much of the area on the ruler behind the target is in focus. If 1/3 of the ruler is in focus in front of the target and 2/3 of the ruler behind the target is in focus then your auto focus system is working perfectly. But, generally the 1/3 and 2/3 rule of thumb is not going to always be perfectly true.
If your target looks blurry and the area on the ruler in line with the target is also blurry then you may have a auto focus problem. Look at the ruler and determine if the area that is in focus is behind or in front of the target. If the area behind the target is in focus you have back focus. If the area in front of the target is in focus then you have front focus. Adjust your auto focus fine tuning until you are satisfied with the results. If your camera does not have auto focus fine tuning, you can not make any adjustments to correct it. You will have to take you images to Nikon service. Nikon service prefers to have some back up documentation such as your memory card with the images as well as some printed photographs showing your problem. Nikon service will want to also have all of your lenses. They are suppose to test your lenses and camera body to determine if your problem is with the camera body or some of the lenses themselves. If your camera has auto focus fine tuning, you should be able to correct any focus accuracy errors using this method.
Links related to focus testing:
http://focustestchart.com/chart.html
http://jasonirons.com/blog/tag/lens-alignment/
http://leongoodman.tripod.com/d70focuspart5.html
http://photography-on-the.net/forum/showthread.php?t=737372
http://photography-on-the.net/forum/showthread.php?t=10526
http://www.peleng8.com/how-to-detect-back-focus.html
http://stanfordphoto.blogspot.com/2007/07/how-to-test-autofocus.html
http://www.talkphotography.co.uk/forums/showthread.php?p=2381369
http://wwww.dchome.net/viewthread.php?tid=284785
http://www.imatest.com/docs/sfr_instructions.html
http://www.bord-studio.com/article_01eng.php
http://focustestchart.com/focus10.pdf
http://www.linuxphoto.org/html/article_frontfocus.html
http://www.astrosurf.org/buil/autofocus/adjust.htm
http://photography-on-the.net/forum/showthread.php?t=294973
http://ghonis2.ho8.com/rebelmod9.html
http://forums.photographyreview.com/showthread.php?t=23080
http://www.loncarek.de/pages/Articles/FocusTarget
I had doubts about the focus accuracy of my viewfinder auto focus system. While I was in a studio my models faces upon which I had focused appeared to be slightly out of focus. The area behind the face like the models hair and shoulders appeared to be slightly more in focus. I normally focused on the eye or face using single point auto focus and using the centre point. I initially assumed that this was normal since I was looking at the images at 100%. Since it was difficult to know for sure I decided to do further testing.
This blog documents the process I used to verify the single, centre point auto focus accuracy of my 4 month old DSLR which does not have auto focus fine tuning. However, you can use the method below to auto focus fine tune your camera if it does have the 'autofocus fine tuning' feature. This method is not testing the sharpness of a lens but only the focus accuracy of the camera and lens combination. I am also deliberately not going to tell you what camera I have since I do not want to create panic or false impressions about the camera.
The assumption made here is that Live View is the gold standard for focus accuracy if you do not have the auto focus fine tuning feature with your camera. If you do have the auto focus fine tuning feature with your camera, then you can compare images as you make auto focus fine tuning adjustments one after another until you feel you got it right. If you don't have auto focus fine tuning then you have to use the live view image as a comparison and the gold standard for accurate focus.
I am also not going to go into the theory behind the testing. That is beyond the scope and purpose of this blog. This blog is only to show a test setup.
I had searched the various ways people have focus tested their cameras including different focus test charts that you were required to angle your camera at 45 degrees. Although I tried this test I have also read that it may be very prone to errors during testing and that it was not the best type of test. My own research found that it was better to use a flat target. So based on my research, here is the method I came up with. I believe it is very accurate. I suggest you follow all the steps that I describe.
Equipment Used:
DSLR - with our without auto focus fine tuning
Prime lens or zoom with a faster aperture than f2 but not too important - use whatever lens you have if you have auto focus fine tuning
Tripod
Ideally you would use a remote trigger
Editing software such as Photoshop to view images at 100%
Flat card board or similar surface
8X10 Target
one metre ruler or tape measure
Conditions:
No wind
Bright sunny day
It's important that the lighting conditions do not change significantly while taking pictures (such as from big clouds passing by) because bad lighting can make details in the pictures look blurry.
The test target:
You probably should not use a curved target because it is difficult to know where the camera's auto focus sensor focuses on. Use a flat target. Here is the target you can download and print. Make sure you print in the highest quality. I used a B&W laser printer. If you print a poor quality target, the edges of the target symbols and numbers can bleed (look blurry) and this might look as if the image is out of focus. So start by printing an excellent quality target. http://www.gpsinformation.org/jack/photo-test/pics/iso-rag.jpg


The target will be attached horizontally to the cardboard. I attached mine about 2 1/2 feet off the ground. I notched out an 'L' shape on one edge of the cardboard and aligned the target with that edge. The purpose of the notch is to rest your ruler on so that it is as close to the target as possible. This will also allow you to see the entire length of the ruler while you focus on the target.

Positioning the Camera and Target:
Position the target about 50 times the focal length away from the camera and tripod set up. So for an 85mm lens, you would put your camera about 15 feet away (sorry about the metric and imperial units of measure). I tested my camera with the lens focal length at 85mm. You can do more testing at other focal lengths. For a 35 mm lens you would position your camera about 5 feet away. For a zoom lens pick a focal length at which the lens is known to perform best. The target and the camera focal plane should be parallel to one another. This means that the camera should be exactly in front of the target. You should not be pointing the camera down at the target or up at the target. You should not be aiming the camera from either side towards the target. The camera and target must be directly across from one another.
For preparing to take the pictures use the following settings on your camera:
- Manual Mode
- open the aperture as wide as it can go.
- the shutter speed must be at least 1/80 of second but faster is better
- adjust the ISO as low as possible to give you a good exposure.Avoid a ISO higher than 800
- VR or image stabilization must be off
- Use a tripod
- Turn shutter delay mode ON
- Use AF-S mode or single shot mode
- Do not use an in-camera picture setting with high sharpness. Use standard settings.
- Do not increase sharpness or other in camera settings
- Use the centre auto focus point only
- Make sure the lens and camera are in auto focus
- Set the live view area focus to narrow - you only need to take pictures in live view mode as we are using it as the gold standard for focus accuracy if you do not have the auto focus fine tuning function with your camera. That's because if you have the auto focus fine tuning feature you are able to adjust the focus accuracy front and back and therefore you can make comparison between those images and adjustments until you feel you got it right. If you don't have auto focus fine tuning, then you have to use the live view image in order to compare your other images against a known standard i.e. live view.
For taking the picture:
- Aim the centre auto focus point onto the centre of the target
- For your lens set the aperture to wide open.
- Adjust ISO to ensure that it is near 200.
- Adjust shutter speed so that it is at least 1/80. (You really need a bright sunny day).
- Make sure you can see the ruler off to the side of the target
- Use your hand and move the the manual focus ring to an out of focus position
- Now half press the shutter and make auto focus work. Once focused it may be a good idea to half press the shutter a few more times to make sure the auto focus is finished working.
- Finally, half press the shutter one more time and take a shot. Move your hands off the camera
- Repeat steps 3 to 5 over again a few more times to make sure you have consistency.
This one photo is using the viewfinder auto focus:

Without touching your equipment setup, gently and carefully switch the camera into live view. Use your hand to carefully and gently rotate the focus ring so that it is out of focus.
- Press the shutter half way and let live view work and focus.
- Make sure to cover the viewfinder with your free hand to not allow light into it and possibly change the exposure.
- When you get a green square take the picture with your hand still covering the viewfinder.

At this point you are finished. You can take more pictures using a different lens. For each lens or different focal lengths on the same lens you can repeat taking pictures using normal viewfinder auto focus as described above (and ending with a photo using live view to compare to if you do not have the auto focus fine tuning feature).
At the Computer:
Take your memory card and look at the pictures you made. I was using Photoshop CS4. I looked at the pictures at 100%. No adjustments were made to the photos other than cropping. Look at your image taken using normal auto focus compare them. If you do not have the auto focus fine tuning feature then compare it to the image taken using Live View. (Your live view image should be completely in focus and is the gold standard). The area on the ruler that is in line with the target should also be in focus. Also look at the ruler and observe how much of the area of the ruler is in focus. Ask yourself, Is the target paper within the area of the ruler that is in focus? If the answer is yes then your camera is focusing accurately. You can also see if the camera is focusing more of the area behind the target or in front of the target.
Comparing normal auto focus on the left and live view auto focus on the right. Or if you have auto focus fine tuning, compare several images while making fine tuning adjustments:

The general rule of thumb is that the camera should focus about 1/3 of the way in front of the target and the remaining 2/3 behind the target. So look at the ruler. Ask yourself, how much of the area on the ruler in front of the target is in focus and how much of the area on the ruler behind the target is in focus. If 1/3 of the ruler is in focus in front of the target and 2/3 of the ruler behind the target is in focus then your auto focus system is working perfectly. But, generally the 1/3 and 2/3 rule of thumb is not going to always be perfectly true.
If your target looks blurry and the area on the ruler in line with the target is also blurry then you may have a auto focus problem. Look at the ruler and determine if the area that is in focus is behind or in front of the target. If the area behind the target is in focus you have back focus. If the area in front of the target is in focus then you have front focus. Adjust your auto focus fine tuning until you are satisfied with the results. If your camera does not have auto focus fine tuning, you can not make any adjustments to correct it. You will have to take you images to Nikon service. Nikon service prefers to have some back up documentation such as your memory card with the images as well as some printed photographs showing your problem. Nikon service will want to also have all of your lenses. They are suppose to test your lenses and camera body to determine if your problem is with the camera body or some of the lenses themselves. If your camera has auto focus fine tuning, you should be able to correct any focus accuracy errors using this method.
Links related to focus testing:
http://focustestchart.com/chart.html
http://jasonirons.com/blog/tag/lens-alignment/
http://leongoodman.tripod.com/d70focuspart5.html
http://photography-on-the.net/forum/showthread.php?t=737372
http://photography-on-the.net/forum/showthread.php?t=10526
http://www.peleng8.com/how-to-detect-back-focus.html
http://stanfordphoto.blogspot.com/2007/07/how-to-test-autofocus.html
http://www.talkphotography.co.uk/forums/showthread.php?p=2381369
http://wwww.dchome.net/viewthread.php?tid=284785
http://www.imatest.com/docs/sfr_instructions.html
http://www.bord-studio.com/article_01eng.php
http://focustestchart.com/focus10.pdf
http://www.linuxphoto.org/html/article_frontfocus.html
http://www.astrosurf.org/buil/autofocus/adjust.htm
http://photography-on-the.net/forum/showthread.php?t=294973
http://ghonis2.ho8.com/rebelmod9.html
http://forums.photographyreview.com/showthread.php?t=23080
http://www.loncarek.de/pages/Articles/FocusTarget
| free web counters |